How To Assemble An Oak Ledged Door
Introduction
Some of you choose to order your oak ledged doors in kit form and the following guide shows the typical assembly process.
We got a skilled joiner to build up this door and some of his tips and wisdom are passed on here.
An oak ledged door kit would usually take him between 25 and 30 minutes to complete - you may wish to allow a little longer!
Please Note: This door used in this guide is our 4 ledged solid oak door where the holes have been predrilled. For our 3 ledged door the holes will need to be drilled.
(![]() To download a printable pdf version of this guide, click here)
To download a printable pdf version of this guide, click here)
What You Will Need
- Level workbench with 2 or 3 softwood battens to rest the door planks on
- Tape measure
- Nylon hammer/mallet
- Steel hammer
- Screwdriver (quicker and easier with an electric screwdriver)
- Sharp 1 inch chisel
- PVA glue
- Steel cabinet scraper OR 120 grit sand paper and a sanding block
1. Unpack Door Components
Remove the cellophane wrapping from the door kit and check that you have:
- 5 x oak door boards
- 4 x pre-drilled oak ledges
- 48 x crosshead self tapping screws
- 48 x oak plugs

2. Lay Out Door Boards
Lay the oak door boards front face down on the softwood battens on your workbench (the door fronts have a bead moulding).
The standard layout for a ledged door is to have a narrow board in the centre,with a wide board either side and then a narrow board on each door edge.
Have a look at the boards and decide which end of the boards you prefer to have at the top of the door - this is the most visible part of the door, so you always want the best end at the top!
3. Push The Boards Together
Assemble the door boards by pushing the tongues into the grooves on each board.
Do not glue the tongues or grooves.

Ideally, you need to leave an even gap of about 1mm between the boards to allow for expansion - these oak doors have been kiln dried and so the oak will not shrink, but if you introduce the door to a moist environment (like a newly plastered room), the door will expand slightly.
4. Level The Door Board Tops
Using a soft nylon hammer or mallet, even up the door board tops - the tongues should slide up and down the grooves pretty easily.

Occasionally, you may find the door boards to be slightly bent, in which case, it's best to cramp them after you've levelled the tops and before fitting the ledges.
5. Lay Out The Oak Ledges
Lay out the oak ledges on the boards, selecting the best ledge for the top of the door and next best for the next ledge down and so on.

Ensure that you have all the pre-drilled holes in the same order on each ledge.
Place the top edge of the top ledge 4" from the door top.

Place the bottom edge of the bottom ledge 7" from the door bottom.

The middle two ledges should be evenly spaced and parallel.
6. Screw The Ledges Into Place
Starting with the top ledge, fix a screw through a pre-drilled hole at each end of the ledge - this instantly braces the top of the door.

Take care not to damage the edges of the plug hole with the screw or drill if you want a perfect finish once the holes are plugged.
Now do the same with the bottom ledge - you should now have a fairly stable door.
Fix screws through the remaining pre-drilled holes in the rest of ledges - there should be 48 in total.
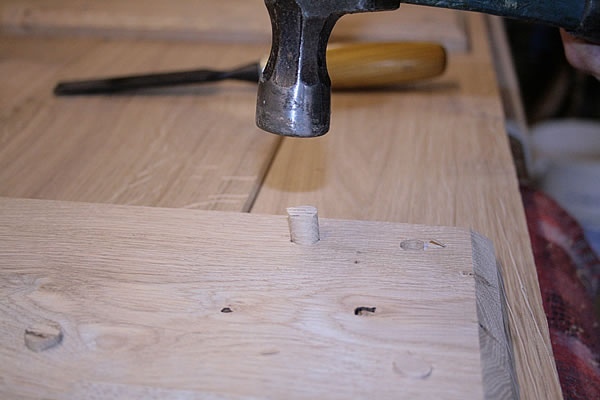
7. Fit The Oak Plugs
Apply a pea-sized blob of PVA glue to each plug hole.

Take an oak plug and align its grain with the grain in the ledge.

Hammer the oak plug into the plug hole, leaving about 5mm of the plug proud of the ledge surface.

Using a sharp 1" wood chisel on its chiselled edge, remove the bulk of the plug excess.

Important tip
If the oak plug has a slope cut end, make sure the top of the slope is positioned away from the direction of chiseling i.e. when you come to chisel off the excess you need to go from the low end to the high end of the plug. This ensures that the plug breaks off above the surface of the hole.
Clean the remainder of the plug off using the flat of the chisel.

What if the plug breaks in the hole or below the surface?
In this case, you'll have to get the remainder of the plug out of the hole and put a new plug in.
Use a narrow 1/2" chisel to dig out the old plug, taking care not to damage the hole edges.

8. Finish Off The Ledges
To make sure you have a lovely smooth finish to the ledges, use a steel cabinet scraper or 120 grit sandpaper on a sanding block to remove any tiny splinters or rough areas.

9. Job Done!
You should now have a beautiful oak ledged door ready for staining, oiling or waxing.


46 Comments
Would be far better with braces, 3 ledges and 2 braces look better and would prevent any slippage!
Chris Martin June 7, 2010 at 7:30pm
Hi Chris
Thanks for your comment.
I'm sorry but I'm going to have to disagree with you on this one!
We're traditionalists a heart here at Peak Oak and the traditional way to build an oak ledged door was without braces.
The Z-backed door you're suggesting was introduced after the First World War when timber was scarce and so thin softwood boards were used to make ledge and brace doors - these needed diagonal bracing.
If you follow the fitting guide, you'll see that the ledges on our doors are screwed diagonally to prevent slippage - we've sold literally thousands and (touch wood) never had one slip yet.
We don't really want to re-invent the wheel and so we'll be sticking to our traditional ways - sorry!
All the best
Adrian
admin June 8, 2010 at 2:54pm
An Oak door looks far better when braced, you won't be re-inventing anything as this has been done millions of times!
Tony Blanchard June 17, 2010 at 8:39pm
Hi,
Peak Oak are spot on with this one!
My last cottage was 400 years old with the original doors, no braces. Our latest house, a 300 year old cottage, where there are original doors they are ledged with no braces.
If you want cheap looking doors go with the Z-backed. Me? I prefer tradition!
Dale Cebula June 27, 2010 at 10:06am
I would also agree with PeakOak here.
I am a carpenter and I fit and build hundreds of reclaimed doors.
It does seem to make sense that the braces add stregth, but the traditional way, when using decent timber and built properly is to just use ledges and these doors last hundreds of years!
On the other hand, screws and plugs aren't very traditional (i use wrought nails, bent over on the back) but as this is a diy kit screws and plugs make much more sense!
Mark June 29, 2010 at 6:51pm
Nice little demo and just in the nick of time. I have 7 oak doors like this to assemble. I have a few worries mostly concerning the oak planks shrinking or warping after assembly. Even though the wood is kiln dried surely the wood will shrink or move further in a central heated home?. I had thought it best to put the door planks on assembly in a few sash claps to squeeze the boards together and then screw the ledges to the backs, what do you think?.
One other question I had was whether to use glue down the t&g planks or back of the ledges, but you don't seem to bother, any reason?.
Barry July 15, 2010 at 12:01am
Hi Barry
Apologies for the slow reply.
Hope you got your doors built up and looking good.
There's no real need to sash clamp the door boards as it's highly unlikely that they'll shrink and if they do, it will be by a millimetre at most.
This is the reason we suggest you don't glue the tongues - each board can expand evenly and you won't end up with split or cracked tongues.
We'd love to see some photos of your finished doors in situ - we could publish them on this blog for all to see if you like!
Peak Oak July 23, 2010 at 10:10am
just got into this as I'm buying a 200 year old cottage.
Be nice if these guides could be in PDF format. Easier to save and store.
Regards
Russ October 4, 2010 at 1:12pm
Thanks Russ and good luck with the new cottage.
The PDF idea is a good one - we'll get onto it ASAP!
Peak Oak October 4, 2010 at 1:50pm
Re: Oak Ledged Doors
Could you please e mail me back and let me know if these doors are suitable for outside use. I have built an oak shed and need to find a suitable oak door kit.
It will not have driving rain on it's surafce as there is a porch. I intend however to leave the door untreated as the rest of the shed is constructed from untreated oak weather boards.
Thank you
Martin
Martin Baldwin April 6, 2011 at 9:48pm
Martin - Good question about outdoor use.
The short answer is no - these doors aren't suitable for use outdoors.
Our oak ledged door kits are kiln dried to a moisture content of between 8% and 10%. This reduces the chance of shrinkage in centrally heated homes.
What you need is a door made from air dried oak with moisture content of 18%-23% and preferably using quarter sawn timber to minimise movement of the wood.
Beware of using green oak for doors - with a moisture content of 30% + a thin board like those used for doors will be very unpredictable.
Hope this helps!
Peak Oak April 7, 2011 at 11:34am
Dang, i thought the plugs should be left sticking out !
anyway. mine are, and are richly admired. and are handy to hang things on.
nigel burrows May 13, 2011 at 6:29pm
Thanks Nigel
Would be great to see a pic!
Peak Oak May 13, 2011 at 6:36pm
Great guide many thanks would it b possible to see one being hung with the T- hinges and the traditional latch ironmongory being fitted would be very helpful thank you
Dan A July 25, 2011 at 10:01pm
Thanks Dan
As luck would have it, Tom's having some ledged doors hung in his house in the next couple of weeks, so we'll make sure to take a series of photos and perhaps a video to show how it's done.
Peak Oak July 27, 2011 at 12:43pm
Very handy - Thanks.
A quick how-to for the application of the OSMO polyx-Oil, and it's pre-stain, would be useful too. I am never sure how much of the excess to wipe off, or how long to leave the staining element on before wiping off (this is to taste, to some extent, I suppose).
Best wishes.
Michael Rutherford August 31, 2011 at 11:45am
Hi
I am enquiring on the same subject as Dan on a guide for hanging your doors using T-hinges and suffolk latch. Did you manage to put one together. It would be extremely helpful as was the assembly guide was. Many thanks Harry.
harry mountain September 13, 2011 at 4:13pm
Harry,
Sorry for the late reply. We are looking to get one put together as soon as we can to help you.
Michael,
We are also planning on creating a how to for Osmo Polyx Oil as soon as we can as well, so please keep checking back.
thanks
Peak Oak September 21, 2011 at 10:30am
I have just fitted the Arrow head hinges to the doors I have been making from reclaimed floor boards. Doors are exactly the same as yours and the Iron Work looks great. One thing I found easier than using a chisel for the plugs was a flush cut saw (super flexible & very sharp) got a cheap one off the web just to try it out and got on great with it. perfect cut every time.
Craig Ashton-Potter October 29, 2011 at 10:01am
Thanks Craig - that's a great tip!
Peak Oak October 29, 2011 at 11:02am
Hello,
Getting ready to buy 10 of your doors for a renovation project.
When fitting T hinges onto the door do these go on the top and bottom ledges or do they go onto the door (directly onto the vertical planks).
My husband is not sure but being a typical male will not ask. lol
Linda November 22, 2011 at 5:29pm
Hi Linda,
When fitting the T Hinges you should be looking to put them onto the actual door rather than on the top or bottom ledges. Hope this helps!
thanks
Peak Oak November 23, 2011 at 12:13pm
hi,is there a specific reason why you would hang the hinges direct onto the planks and not the ledges,surely the screw would have to be to short,to prevent it going right through,and if your in a position where you've got to fit hinges on front side, does this still matter if there positioned to screw through into ledgeds from front,i worked on a stable conversion where a joiner ( a really good one at that) put hinges on ledges with no adverse affects.
Thanks
mitch December 16, 2011 at 6:18pm
Hi Mitch,
The main reason for hanging the hinges direct to the plank rather than the ledges is because the ledges are designed to hold the door together not to hang. When putting the hinges onto the ledges it will alter the rebate from 22mm to 43mm.
Putting the hinges onto the ledges could also give a gap between the frame and the end of the ledge
Ideally the hinges should be put underneath the top ledge but above the bottom ledge.
Hope this helps
Peak Oak December 23, 2011 at 12:09pm
When sitting in a room, be it lounge or kitchen, with the door is closed, should one see the ledged side or the door fronts?
Colin January 14, 2012 at 5:30pm
hi Colin
Normally you would have the ledges facing inwards towards the room
Peak Oak January 18, 2012 at 11:39am
Just looking around for info as i intend on building a L+B door for a cellar, this guide has really helped make me sure that the traditional way without the Z frame looks good also.Do you think this will be a secure application as a cellar door
Seb w October 10, 2012 at 12:19am
Hi Seb,
It is unlikely that this would be suitable for use as an interior cellar door. The main reason is because of the warm air of the home and the cold air of the cellar meeting, causing condensation resulting in your door absorbing moisture.
If your cellar is heated, this may be less of a problem.
Thanks
Peak Oak October 12, 2012 at 11:45am
I have six oak doors fitted with only rosehead nails and no screws and three ledges,looks good although i have some warping so maybe next time i'll have both.
It was also recommended that i use danish oil but i have since removed using wire wool and retreated with raw linseed oil giving the doors a rich looking sheen,the process and drying time is long but the results are well worth it.Maybe of interest to some of your customers,good website and hope to visit.
Regards Dave.
Dave March 14, 2013 at 10:18am
Hi there, i know this is an old post but i have a question - and your advice would be welcome.
What do you think to screwing the boards together - this question applies to all sorts of applciations, eg screwing worktops down etc etc ?
By rights, if the boards shrink, then the screws will stop them shinking and splits or gaps show up. Do you think that this is the case, or do you think that the screw will twist towards to direction of the shrinkage. Gluing the brace would defiantely not allow the planks to shrink, and they would certainly split somewhere
What do you think ?
Thanks
Will August 1, 2013 at 3:12pm
Hi Will,
For the application of worktops, it is not something we deal with and so cannot really recommend the correct procedure.
For our doors however we can comment.
As you are screwing or glueing the timber together, the door effectively becomes one solid piece of timber. Therefore if it begins to grow from any moisture, the boards will push against each other resulting in the timber expanding. With the front boards pushing this will lead to a cupping or bowing across the door as the boards will simply have nowhere to move.
If any shrinkage was to occur however in this situation, it would be less of a problem. Small gaps could potentially appear between the boards, but these would be hidden due to the tongue and grooves.
I hope this answers your question.
Peak Oak August 7, 2013 at 12:25pm
Hi Peak Oak,
I would like to replace all my doors for your oak ledged doors, the problem is that 4 of the original doors are 90" high. 3 of them are 18" wide and 1 is 24" wide. All the other doors are 78" high. Is this something you could supply either fully assembled or supplied in kit form.
Many thanks
Ken
Ken Cain March 31, 2015 at 10:30am
Hi, my problem is trying to fit an insurance approved mortice lock to my wide plank ledge (no braces) door, assembled with rose head cast iron nails into the ledges. Is 'boxing in' the mortice lock internally, above the midrail, an option? Thanks - Paul
Paul Morrison June 9, 2015 at 6:40pm
What a brilliant and clear guide !!
Matt McMadd December 4, 2015 at 9:45am
I would like advice on best practices when fixing dried European oak boards. The task in hand is an arched top garden gate. This will be a mortice and tenon construction. What in your experience is the best fixings to secure the T&G boards? methods?
Many thanks.
Spencer J Faulkner March 14, 2016 at 6:39am
Hi Spencer,
As suppliers of internal oak doors only, external doors are not really our area of expertise. However having spoke to a local joiner, his method would be to fix the boards via screwing. Plenty of space would need to be allowed between the tongue and groove to allow for movement and swelling. He would not recommend glueing because of this reason.
Hope this helps.
Peak Oak April 12, 2016 at 1:57pm
Just started putting together the Hartington doors, really happy with them, followed the instructions. I have noticed that the door boards on this door definitely have a flat side and a more rounded side. I have put all the flat sides together and then put the braces on that side. Nothing in the instructions about this but it worked well for me so far.
Graham July 27, 2016 at 2:24pm
I notice that you have not replied (publically at least) to Paul Morrison's question concerning fitting a mortice lock to a plank ledge door. I have a similar insurance requirement and would like to be able to fit a mortice lock to a Z-backed door with horizontal and diagonal braces; but I suspect that the whole structure is too flimsy to support a mortice lock within the central brace and vertical planks? It has worked fine as an external door until now; but I suppose the result is a new door?
Thanks.
Peter September 8, 2016 at 12:01am
Hi Graham,
Yes the Hartington Solid Oak Doors are indeed a slightly differently designed door. This particular guide has been designed for our 4 Ledge Solid Oak Doors (http://www.peakoak.co.uk/doors/ledge-and-brace-doors/)
As you have mentioned, the Hartington Solid oak doors have a flat side and a side with a "wave". The flat side is the side in which the four ledges should be fitted onto.
I'm glad you are happy with your doors!
Peak Oak October 7, 2016 at 1:31pm
Hi Peter,
For an external oak door, we would normally suggest a framed and planked oak door. This would then enable you to fit your mortise lock.
All of our solid oak doors are designed strictly for internal use only. We would not recommend using these doors externally.
Peak Oak October 7, 2016 at 1:40pm
We are interested in your Oak Ledged doors. However can you supply Oak Latches?
Mike Wells January 10, 2017 at 8:21am
Traditionaly internal doors were only ever ledged certainly not brased. The t&g never glued. Pine doors look fine with rose head nails driven through the board, then clinched, tipped and punched into the ledge and left proud.
I have six of these and they are over 250 years old. They have never sagged or warped.
David Green June 19, 2017 at 11:56am
I am making some doors using 4 ledgers and 3 battens which are about 270mm wide. what problems could I expect in the future using wide boards. If there is any advice you could give me I would greatly appreciate it.
thanks
paul June 24, 2017 at 2:47pm
So pleased to have stumbled on this very helpful article! I was trying to research whether it's a mistake not to use braces. As you say, older doors often don't have them but according to the internet you'd think doors are doomed without them. Yours is the first mention I've found to the contrary and very reassuring that the door I'm planning to build is NOT so outlandish as I was beginning to think! Thank you.
Hilary Shepherd April 6, 2021 at 5:45pm
Did you ever make the pdf mentioned above?
Hilary Shepherd April 6, 2021 at 5:46pm
Hi Hilary,
Glad to hear that the article was helpful for you!
As for the PDF version, this can be downloaded at the top of the page (underneath the introduction).
Peak Oak April 12, 2021 at 5:34pm
Add a comment