How To Fit An Oak Door
Introduction
As many of you will already have seen, we have a guide available on How To Assemble An Oak Ledged Door.
Once the door is assembled the next step is of course fitting the oak door into place.
This step by step guide outlines the sequence for fitting an oak ledged door with wrought iron T-hinges and a Suffolk latch
(![]() To download a printable pdf version of this guide, click here)
To download a printable pdf version of this guide, click here)
What You Will Need
- Assembled Oak Ledged Door
- Suffolk Latch & Hinge Set
- Spirit Level
- Screwdriver
- Screws
- Handsaw
- Plane
- Hand Drill
1. Install Door Frame
Before you begin to fit your oak door, you need to ensure that the door casing or frame is perfectly perpendicular and square within the opening.
Get this wrong and you will plant the seeds of much strife later on - you have been warned!
2. Measure The Door
The next step is measure out the length and width of the door frame and the length and width of your oak ledged door.
If the measurements of the door do not match those of the door frame you should trim the door to an approximate size using a handsaw.
An extra 2-3mm extra should also be trimmed from the oak door to accommodate for the gaps.

Next, trial fit the door in the frame, making sure that the door edge to be attached by the hinges is perfectly aligned with the frame and with an even 2-3mm gap all the way down.
Note: The traditional fitting of oak ledged doors is for the ledged side of the door to face the inside of the room.
Now mark any edges of the door which need planing to provide an even 2-3mm gap all the way around the door.

Using a hand plane, remove the marked areas a little at a time and keep trial fitting until the gaps are even around the entire door.
You may wish to have a slightly larger gap for the door bottom, if it needs to clear any unevenness in the floor.

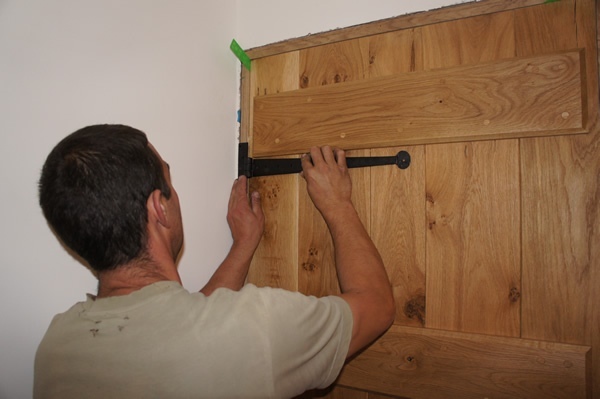
3. Fitting The Hinges
Now that the door has been correctly modified to fit into the door frame, the next step is to install the hinges for the door.
When installing the top hinge, you should look to place it as close to the top ledge of the door as possible.
The center of the hinge knuckle should also be aligned centrally to the 2-3mm gap of the door.
Note: Traditionally, the T-hinges were fitted to the door boards NOT the ledges and this is how we recommend you fit them.

Once aligned, drill pilot holes through the hinge into the door casing/frame.
Attach the hinge to the door frame using strong screws.
Now pull the unattached "long" part of the hinge across the door boards to remove any play in the hinge.
Once again, drill pilot holes and attach the hinge to the door boards using just a couple of screws (once you've tested that the door hangs and swings correctly, you can attach the remaining screws).

Once the top hinge has been fitted the next step is to fit the bottom hinge of the door.
This hinge should be aligned just above the bottom ledge of the door.
As before, drill pilot holes into the frame and attach the hinge using strong screws.
This time push the unattached part of the hinge in towards the knuckle to remove any play.

Again, attach the hinge to the door boards using a couple of screws to allow for adjustment.

4. Fitting The Latch
Now that the hinges have been fitted, the next step is the fit the latch to the door.
Start by taking the door bar of the latch and marking out where you would like the screw that will hold it, to be positioned.
This is normally just a couple of centimeters above the second ledge.
Once marked, drill a pilot hole and attach the bar using a strong screw.

Next, line up exactly where you would like the clasp to be placed on your door frame in relation to the bar.
You may prefer the door bar to be fitted straight and therefore will need the clasp to be level with the bar.
In this example we have fitted the door bar at an angle as we believe it rides easier when closing.

Once this point has been marked, drill a pilot hole to stop the frame splitting.
Knock the clasp into the pilot hole gently using a hammer.

Next, attach the staple using pilot holes and strong screws.


Test the operation of the bar and clasp and once you're satisfied that the door will close easily, screw the clasp to the frame, drilling a pilot hole first.

With these parts now installed, you can now finally fit the main part of the latch.
First, ensure that the width of the drill bit is fractionally wider than the thickness of the latch bar.

Mark out a point at the base of the door bar when it is in its "sitting" or closed position.
This mark should be made at around the midpoint of the door bar's length.
Now mark a second point, a couple of centimeters (equivalent to the latch bar's depth) down from the first point, to ensure that the top of the latch bar will just touch the bottom of the door bar.
Finally, mark a point above the first point for the door bar's open position.


Drill a hole through each of the marks and then join the holes to create one large hole, big enough for the latch bar to fit through.
You may want to use a chisel to make the hole edges appear smoother and cleaner.


The final task is to fit the handle.
To do this, simply align the handle vertically on the outside of the door, drill pilot holes and attach using strong screws.


5. Final Touches
Once you're happy that the door works perfectly, return to any holes in the hinges which need screws, and check that everything is tight and secure.

6. Job Done!


11 Comments
Hi faboulous descriptions with excellent images. im teaching my son the craft and found your post on door installation extremely informative thanks for sharing.
Doors Glasgow May 18, 2012 at 3:21pm
Great job lads, door looks great. Great detailed description and images! Perfect!
Micheal September 23, 2012 at 11:29am
Thanks for the clear instructions and tips, just what i needed
Graham From Somerset November 4, 2012 at 1:56pm
Brilliant instructions. Clear step by step instructions with supplementary pictures. Thank-you.
Rolf May 21, 2014 at 11:44pm
I am in love with this website, traditional, real wood and stunning, I will be visiting Peakoak very soon, I just cant wait.
Sema August 25, 2014 at 11:30pm
Thanks, great stuff, we will do all our doors like this
Thanks for the clear instructions
Robert October 1, 2014 at 9:09pm
Wouldn't it be better to fit the latch horizontal, instead of tilted up like that? I can see no reason not to make it horizontal, and it would look better.
D. Stirling October 14, 2014 at 9:38pm
Hi, can I fit the t hinges on the ledges because my door stop is already fitted on my frame and the door is the right thickness , and I've purchased a lock block
Stephen Doble January 27, 2015 at 8:48pm
What a great site for the novice. I found the instructions clear and easy to follow. And have passed to a number of people that have ask if your site was any good.
Graham February 10, 2015 at 1:57pm
Hi, can I fit the t hinges on the ledges because my door stop is already fitted on my frame and the door is the right thickness , and I’ve purchased a lock block
Stephen Doble February 22, 2015 at 9:12pm
Hi,
The latches can indeed be fitted horizontal if that is your preference. However with a latch that is fitted at an angle, the bar will generally slide into the keep much easier than a latch that is fitted horizontally.
Hope this helps.
Peak Oak June 10, 2016 at 6:26pm
Add a comment